FAQS
Product Warranty
Please visit our warranty page here.
If you are in the U.S. and need to file a Warranty claim, please fill out the Warranty Claim form here www.giro.com/Contact-Us or call 1-800-456-2355 to speak with a representative. Once you’ve completed and submitted the Warranty Claim form, a Warranty Service representative will contact you with instructions on how to properly return your Giro product.
Note: Giro’s warranty policy as noted here extends to residents of the United States only. For further information on claims outside of the United States, please call our Customer Service team at 1-800-456-2355, or contact your local Giro Authorized distributor.
Once a claim is filed, please send us the product with your Warranty Claim form or file number, proof of purchase and contact information. We encourage you to send your product to us by a traceable method (such as FedEx or UPS). Giro is not responsible for lost or misdirected packages.
Ship to:
Giro Customer Service
1001 Innovation Road
Rantoul, IL 61866
Please allow 1-2 weeks for delivery. For non-delivery or further information, call us at 1-800-456-2355.
If the exact product or style you originally purchased is not currently available (i.e. discontinued, limited edition, etc.), please choose a comparable new product and indicate the substitution model in your communication with us. The new product should be equal or lesser in retail value than the style you are returning.
If you are unsure about your choice in comparable products, please contact a Customer Service team member at www.giro.com/Contact-Us for details and information. Thank you!
Bike Helmets
The best helmet we can recommend is the one that meets these three criteria:
• It fits your head comfortably and securely
• It offers the most coverage you’re comfortable with
• It meets the most relevant standards for the type of riding you enjoy.
Design, features and price can also be considerations, but those are personal choices that we can’t provide guidance on.
By asking this question, we recognize that you may be seeking to understand what the “safest” helmet is for you. There’s a reason we can’t provide the simple answer you’re seeking: Every impact is a unique event, and we can’t predict how you’re going to impact the helmet. See “What’s the Safest Helmet?” for more information on this question.
Proper fit is essential because the helmet’s performance can be compromised if the helmet doesn’t fit properly. Getting a proper fit is easy if you follow the steps outlined below, or in this video.
Determine Your Size
To determine the correct size, you should measure the circumference of the head. To do this, just wrap a measuring tape around the head, keeping the tape just above the ears and level front to back. Once you’ve determined the correct measurement, you can select a helmet in the correct size or size range.
Put the Helmet On
Start by putting the helmets on and checking to make sure the helmet fits comfortably and securely. Helmets with a fit/stability system should fit with just a little room between your head and the headband when the fit system is loose. If it does not, you should replace it with one that does. Helmets without a fit system (pads only, such as a full-face helmet) should fit snugly but comfortably.
Once on and adjusted, a helmet should fit snugly on the wearer’s head, so that the skin on the forehead moves slightly when the helmet is moved back and forth. It should not cause a headache or be uncomfortably tight.
You should always wear the helmet positioned low enough in the front to protect your forehead, but not so low that it hinders your vision. A space of approximately 1 inch/2.5cm between the edge of the helmet and your brow is a good reference.
Adjust the Fit/Stabilizing System
For safety reasons, we recommend that you do not attempt to adjust the fit of a helmet while you are riding.
To adjust the fit tension of the fit/stabilizing system while the helmet is on the wearer’s head, simply rotate the dial adjuster on the back of the system to tighten or loosen the fit as needed. You can adjust the fit even more on helmets with systems that offer height adjustment, which allows the helmet’s fore/aft tilt to be optimized. Simply move the system’s occipital pads (at the back of the helmet) up or down for comfort and best coverage. Experiment until you get a fit that is most comfortable.
Adjust the Straps at the Ears
With a proper fit, the front and rear straps should join at a point slightly below the ears. To adjust the strap positioning, open the adjusters on the straps around the ears, put the helmet on and slide the straps through the adjusters until they are located comfortably under the ears. Make sure there is no slack in any of the straps. Finally, make sure the adjusters are secured.
Adjust the Helmet’s Chinstrap and Buckle
Fasten the chinstrap buckle and tighten the straps until the helmet fits snugly. How snugly? You should be able to open your mouth wide enough to eat. Make sure the chinstrap is well back against the throat, NOT on the point of the chin. Straps worn on the point of the chin increase the chance of a helmet coming off in an accident. Make sure the loose ends of the strap pass through the rubber O-ring near the buckle. If it does not, the strap may slide loose and the helmet can come off accidentally. Always wear the helmet with the chinstrap buckle fastened and the strap pulled tight.
Check for Proper Fit
Once you think a proper fit has been achieved, grab the helmet with both hands and twist lightly it to the left and right. If the helmet fits properly, the skin on the forehead will move as the helmet moves. If it does not, the helmet is too loose.
Next, grab the helmet with both hands and try to remove it by rolling the helmet forward and backward. THIS IS IMPORTANT. If you can roll it off the head completely, roll it forward so far that it blocks vision, or backward far enough to expose the forehead, it doesn’t fit correctly. If you cannot adjust the helmet to fit properly according to these instructions, DO NOT USE THE HELMET. Replace it with a different size or model.
Once you are satisfied that the helmet fits correctly and that all straps are properly adjusted, take a short test ride. Make any minor adjustments to improve comfort and stability. If you have questions about fit, contact us at www.giro.com/Contact-Us.
Some models feature our integrated POV camera mount, which is designed to break away in the event of an impact. We do not recommend mounting cameras or other accessories to helmets since they can damage the helmet or potentially reduce its effectiveness in the event of an impact.
Unfortunately, the answer to this question isn’t simple. The reason why there is no simple answer comes down to one undeniable fact:
• Every impact is a unique event with multiple variables, and we can’t predict exactly how those variables will define your helmet’s impact.
The primary purpose of a cycling helmet is to help reduce the chances of, and/or the severity of, head and brain injury from a fall or crash. So, the desire to understand which helmet(s) can provide the best protective capability is a common question.
The truth is that every fall or crash is a unique event defined by many variables. From rider mass and velocity, to surface friction and density, to temperature, to biological variances and more – there are a huge range of factors that prevent us from knowing exactly what will happen when you fall. And it is important to understand that there is no single helmet that can prevent all potential injuries.
Helmet testing provides us with data that demonstrates how effective a given helmet can be at managing energy across the scenarios outlined in various helmet standards test protocols. We impact about 200 helmets of each model during development to understand how that shape works to the various worldwide standards and to our own internal standards. We aren’t allowed to share our test data (keep in mind there would be hundreds of documents for each model) with the world however, as this information is considered proprietary.
We completely understand the desire to know which helmet is “best”, but even with test data this would be misleading. Each accident is different, and in some accidents the “better” helmet from one scenario may not work as well as one which had slightly lower marks.
Nearly every type of activity has a standard that we test to, and those test results can be taken as a predictor of the helmet’s potential to help reduce the chances or severity of injury. But that data is not equivalent to a guarantee, because there is no way to correlate the test results directly to every crash.
This also relates to why helmet manufacturers don’t share test data. For all of the work that’s done in good faith, and with proper protocols and controls in place, even the test results can vary slightly from one test to another. Relying solely on test results to rank or score a helmet’s “Safety” could lead to assumptions or even claims that would be irresponsible to publish.
Based on the variety of activities and design criteria, our point-of-view is that there is no single best standard. This is why we recommend that you choose a helmet that meets the most relevant standards for the type of riding you enjoy.
There are many different standards that help to define the spectrum of cycling helmets, and each standard is based on the specific type of riding and user they address. Each standard has a unique set of criteria too, based on research or other factors that can influence the development of the standard. And over time, standards evolve based on research and technological advances.
We completely understand the desire to know which standard is “best”, but even with test data this would be misleading. Each impact is different, and there are many variables that a helmet needs to address. In some impacts, a helmet designed to the “better” standard from one scenario may not be as effective as a helmet designed to a “lower” standard which had different criteria.
The bottom line is that nearly every type of activity has a standard that we test to, and those test results can be taken as a predictor of the helmet’s potential to help reduce the chances or severity of injury. But that data is not equivalent to a guarantee, because there is no way to correlate the test results directly to every crash.
For more information on the standards for cycling, snowsports and powersports, as well as a deeper discussion, we recommend that you visit the “Standards” section on Helmetfacts.com to learn more.
The Multi-directional Impact Protection System (MIPS) is a low-friction liner inside the helmet that helps to reduce rotational energy to the brain in an angled impact. The MIPS system allows the helmet to rotate independently around your head, redirecting impact energy and providing more protection in certain impacts.
Based on what we have observed from our own testing and from review of MIPS’ data, we believe that helmets equipped with MIPS can provide more protection in certain impacts. Research into the effectiveness of this technology, and how to further improve it, is ongoing and we are at the forefront of this work. For now, we are believers in the potential of this technology to enhance protective capability of helmets.
Helmets are designed to reduce as much energy as possible while meeting and exceeding stringent safety standards. Through our extensive trials, we believe that helmets equipped with MIPS can provide an additional measure of protection in certain impacts. However, every crash is different, making the individual results difficult to quantify.
For more information on this topic, see “WHICH HELMET IS SAFEST?” for a detailed answer to the question about comparing helmet performance.
We make a general recommendation of replacing a helmet every three to five (3-5) years depending on use and handling. This is based on observation of the average user, and factors like wear over time, weather, handling, the potential for degradation from personal care products like sunscreen or bug spray, and the simple fact that helmets do improve over time.
While helmets kept in good condition can provide protective capability beyond the 3-5 year recommended lifespan, it’s also true that they can degrade over time. This is why we recommend replacing the helmet within this regular interval.
If you fall and the helmet is impacted, you should have the helmet inspected or replace the helmet immediately, even if no damage is visible. The reason is that helmet liners are made to absorb energy from impacts and they do this through their own degradation or destruction – like an airbag in a car. If the liner is compromised from an impact or other factors, it may not offer the full protective capability it was designed to provide.
Helmets don’t last forever. Damage to a helmet is not always visible. If a helmet is visibly damaged (cracked outer shell, crushed or cracked foam liner or any other damage) don’t use it. Some or all of the helmet’s protective capacity is used up when impacted.
If at any time you are unsure or have questions about your helmet’s condition, we recommend that you visit your local retailer.
If your helmet is more than five years old, we may not have spare parts available. Contact us at www.giro.com/Contact-Us concerning replacement parts or any questions you may have concerning Giro products.
Cleaning and Storing a Helmet
Be gentle, helmets are generally made of materials that can be damaged by many commonly-available cleaners. Petroleum-based solvents or cleaners are especially dangerous. They can damage a helmet so that its protective capabilities are significantly reduced. Many times, this damage is not visible. For best results, clean the helmet using a soft cloth or sponge, warm water and mild soap (such as a mild dish soap). Allow the helmet to air dry and then store it in a cool, dry place where it won’t get damaged.
Note that excessive heat can damage your helmet. For example, in direct sunlight a dark gear bag, the interior of a car, or an automobile trunk can get hot enough to cause heat damage (damaged helmets will appear to have uneven or bubbly surfaces). Therefore, when not being used for a period of time we recommend that the helmet be placed back into its box or case and stored in a cool, dry place.
Lice Removal
If you are concerned about lice infestation, here’s a simple, effective way to get rid of them:
• Do not use a spray of any type.
• Place the helmet into an airtight plastic bag for 48 hours. Then, remove the pads and use a soft cloth or sponge, warm water and mild soap to clean the surface.
• Discard the pads and plastic bag (keep bag out of reach of children due to suffocation hazard) and visit your local dealer or contact the manufacturer for replacement pads.
Giro does not recommend paints or solvents of any kind be used on the helmets. They can damage a helmet so that its protective capabilities are significantly reduced.
If your Giro helmet has been involved in an accident, you may be eligible for a discount on a new Giro replacement helmet. To learn if your helmet qualifies, please email us at giro-consumersupport@giro.com with the below information:
• Picture(s) of the damaged Giro helmet
• Giro helmet model and serial number
• Giro helmet size and color
• Giro helmet manufacture date
• Your full name
• Your phone number
• Your shipping address
This Crash Replacement Program is available to US customers only. Customers in the U.S. should please call us at (800) 456-2355 or e-mail us at giro-consumersupport@giro.com regarding helmets that have been involved in a crash or require spare parts. If you live outside of outside of North America Please see www.giro.com/Contact-Us for contact details for more information. Please note that Giro customers are only eligible for one discounted replacement helmet per year. Thank you!
Giro™ cycling helmets are intended for cycling. (“Giro™”), located at 5550 Scotts Valley Drive, makes the following Limited Warranty concerning Giro™ cycling helmets. This Limited Warranty is made only to the original purchaser. It is not transferable, and is void to any subsequent owner.
Giro™ cycling helmets are guaranteed to be free from defects in materials and/or workmanship for a period of one (1) year from the date of purchase. Giro™ will, at its option, replace or repair defective helmets. To receive warranty service, within one year the original owner must return the helmet to an authorized Giro™ dealer along with the original sales receipt.
This warranty does not cover defects, damage, malfunctions, or failures resulting from abuse, neglect, improper care, alteration, collision, or a crash.
Please see www.giro.com/Contact-Us for contact details and information about initiating a return authorization if necessary. Thank you!
GIRO ANNOUNCES VOLUNTARY RECALL OF GIRO MERIT HELMET:
Bell Sports, Inc. (“Giro”), of Scotts Valley, Calif, is voluntarily recalling Giro Merit helmets.
Hazard: The helmet straps on some Giro Merit helmets manufactured prior to January 2023 may disengage with the helmet when pulled with relatively little force, posing a risk of injury to the user in a crash. Giro is not aware of any incidents in the field related to this issue.
Description: This recall only involves Giro Merit helmets manufactured prior to January 2023. A Giro Merit helmet can be identified by the model name “Merit” on the rear/side of the helmet. It can also be identified by the inner helmet sticker which has the model name “Merit” written on it and also bears the alphanumeric identifier (GH230).
What to do: Consumers should stop using these helmets immediately and contact Giro. Merit owners in the USA can contact Giro at (800)456-2355 (option 4) between 8 a.m. and 5 p.m. CT, Monday through Friday or email us at consumersupport@bellgiro.com. International customers should contact the retailer they purchased their Merit helmet from. Giro will provide a replacement helmet of the same model/size that has been validated to be unaffected by this manufacturing defect.
For more information, click here
Snow Helmets
The best helmet we can recommend is the one that meets these three criteria:
• It fits your head comfortably and securely
• It offers the most coverage you’re comfortable with
• It meets the most relevant standards for the type of riding you enjoy.
Design, features and price can also be considerations, but those are personal choices that we can’t provide guidance on.
By asking this question, we recognize that you may be seeking to understand what the “safest” helmet is for you. There’s a reason we can’t provide the simple answer you’re seeking: Every impact is a unique event, and we can’t predict how you’re going to impact the helmet. See “What’s the Safest Helmet?” for more information on this question.
Proper fit is essential because the helmet’s performance can be compromised if the helmet doesn’t fit properly. In order to offer you the best value and fit possible, Giro makes helmets in many sizes, including:
Small = 52 – 55.5cm / 20.5 – 21.75in.
Medium = 55 – 59cm / 21.75 – 23in.
Large = 59 – 62.5cm / 23 – 24.25in.
XLarge = 62.5 – 65cm / 24.50 – 25.50in.
Youth XS/S = 49 – 52cm / 19.25 – 20.5in.
Youth M/L = 52 – 55.5cm / 20.5 – 21.75in.
Getting a proper fit is easy if you follow the steps outlined below, or in this video.
Determine Your Size
To determine the correct size, you should measure the circumference of the head. To do this, just wrap a measuring tape around the head, keeping the tape just above the ears and level front to back. Once you’ve determined the correct measurement, you can select a helmet in the correct size or size range.
Put the Helmet On
Start by putting the helmets on and checking to make sure the helmet fits comfortably and securely. Helmets with a fit/stability system should fit with just a little room between your head and the headband when the fit system is loose. If it does not, you should replace it with one that does. Helmets without a fit system (pads only, such as a full-face helmet) should fit snugly but comfortably.
Once on and adjusted, a helmet should fit snugly on the wearer’s head, so that the skin on the forehead moves slightly when the helmet is moved back and forth. It should not cause a headache or be uncomfortably tight.
You should always wear the helmet positioned low enough in the front to protect your forehead, but not so low that it hinders your vision. A space of approximately 1 inch/2.5cm between the edge of the helmet and your brow is a good reference.
Adjusting the Fit Pads
The helmet fits correctly when it is held firmly but comfortably in place by the interior fit pads and the fit system. The fit pads and liner inside the helmet are held in place by hook and loop fasteners. You can move them slightly and use any combination of the different thickness pads (if provided with the helmet) until the helmet fits firmly and comfortably on your head.
Adjust the Fit/Stabilizing System
Your helmet may come with one of Giro’s patented fit and stabilizing systems. The systems are fully adjustable and they enhance the fit and stability of your helmet, but they are not a replacement for your helmet’s straps.
To adjust the fit and stability system while the helmet is on your head simply turn the dial to tighten or loosen the fit, which should be snug enough to prevent the helmet from sliding on your head, but not uncomfortable.
You can adjust the fit even more on helmets with systems that offer height adjustment, which allows the helmet’s fore/aft tilt to be optimized. To adjust the height, remove the helmet from your head and then slide the rear of the fit system up or down. Experiment until you get a fit that is most comfortable.
Adjusting the Chinstraps and Buckle
Fasten the chinstrap buckle and tighten the straps until the helmet fits snugly. How snugly? You should be able to open your mouth wide enough to eat. Make sure the chinstrap is well back against the throat, NOT on the point of the chin. Straps worn on the point of the chin increase the chance of a helmet coming off in an accident. Make sure the loose ends of the strap pass through the rubber O-ring near the buckle. If it does not, the strap may slide loose and the helmet can come off accidentally. Always wear the helmet with the chinstrap buckle fastened and the strap pulled tight.
Check for Proper Fit
Once you think the proper fit has been achieved, grab the helmet with both hands and twist it to the left and to the right. If the helmet fits properly, the skin on the forehead will move as the helmet moves. If it does not, the helmet is too loose.
Next, grab the helmet with both hands and try to remove it by rolling the helmet forward and backward. THIS IS IMPORTANT. If you can roll it off the head completely, roll it forward so far that it blocks vision, or backward far enough to expose the forehead, it doesn’t fit correctly. If you cannot adjust the helmet to fit properly according to these instructions, DO NOT USE THE HELMET. Replace it with a different size or model. Once you are satisfied that the helmet fits correctly and that all straps are properly adjusted and tightened, take a short test ride. Pay attention to overall comfort and helmet stability while riding. Make any minor adjustments to the fit pads, straps and stability systems to improve comfort or stability If you have questions about fit, contact us https://www.giro.com/Contact-Us.
Some models feature our integrated POV camera mount, which is designed to break away in the event of an impact. We do not recommend mounting cameras or other accessories to helmets since they can damage the helmet or potentially reduce its effectiveness in the event of an impact.
Unfortunately, the answer to this question isn’t simple. The reason why there is no simple answer comes down to one undeniable fact: Every impact is a unique event with multiple variables, and we can’t predict exactly how those variables will define your helmet’s impact.
The primary purpose of a snow helmet is to help reduce the chances of, and/or the severity of, head and brain injury from a fall or crash. So, the desire to understand which helmet(s) can provide the best protective capability is a common question.
The truth is that every fall or crash is a unique event defined by many variables. From rider mass and velocity, to surface friction and density, to temperature, to biological variances and more – there are a huge range of factors that prevent us from knowing exactly what will happen when you fall. And it is important to understand that there is no single helmet that can prevent all potential injuries.
Helmet testing provides us with data that demonstrates how effective a given helmet can be at managing energy across the scenarios outlined in various helmet standards test protocols. We impact about 200 helmets of each model during development to understand how that shape works to the various worldwide standards and to our own internal standards. We aren’t allowed to share our test data (keep in mind there would be hundreds of documents for each model) with the world however, as this information is considered proprietary.
We completely understand the desire to know which helmet is “best”, but even with test data this would be misleading. Each accident is different, and in some accidents the “better” helmet from one scenario may not work as well as one which had slightly lower marks.
Nearly every type of activity has a standard that we test to, and those test results can be taken as a predictor of the helmet’s potential to help reduce the chances or severity of injury. But that data is not equivalent to a guarantee, because there is no way to correlate the test results directly to every crash.
This also relates to why helmet manufacturers don’t share test data. For all of the work that’s done in good faith, and with proper protocols and controls in place, even the test results can vary slightly from one test to another. Relying solely on test results to rank or score a helmet’s “Safety” could lead to assumptions or even claims that would be irresponsible to publish.
Conform Fit™ is our proprietary fit system designed for the Range™ MIPS and Stellar™ MIPS helmets. Conform Fit allows the outer shell of the helmet to move and adapt to the size of your head, guaranteeing best-in-class comfort and fit, as well as the lowest profile helmet possible.
MIPS, which stands for Multi-directional Impact Protection System, is the leading slip plane technology designed to manage rotational energy that can result from an impact and lead to, or contribute to, brain injury. MIPS was developed by scientists at the Karolinska Hospital and the Royal Institute of Technology in Stockholm, Sweden. The concept is based on 19 years of academic research, and we’ve spent several years collaborating with the designers of this technology while evaluating other approaches to managing rotational energy from impacts as well.
Based on what we have observed from our own testing and from review of MIPS’ data, we believe that helmets equipped with MIPS can provide more protection in certain impacts. Research into the effectiveness of this technology, and how to further improve it, is ongoing and we are at the forefront of this work. For now, we are believers in the potential of this technology to enhance protective capability of helmets.
Helmets are designed to reduce as much energy as possible while meeting and exceeding stringent safety standards. Through our extensive trials, we believe that helmets equipped with MIPS can provide an additional measure of protection in certain impacts. However, every crash is different, making the individual results difficult to quantify.
For more information on this topic, see “WHICH HELMET IS THE SAFEST?” for a detailed answer to the question about comparing helmet performance.
We make a general recommendation of replacing a helmet every three to five (3-5) years depending on use and handling. This is based on observation of the average user, and factors like wear over time, weather, handling, the potential for degradation from personal care products like sunscreen or bug spray, and the simple fact that helmets do improve over time.
While helmets kept in good condition can provide protective capability beyond the 3-5 year recommended lifespan, it’s also true that they can degrade over time. This is why we recommend replacing the helmet within this regular interval.
If you fall and the helmet is impacted, you should have the helmet inspected or replace the helmet immediately, even if no damage is visible. The reason is that helmet liners are made to absorb energy from impacts and they do this through their own degradation or destruction – like an airbag in a car. If the liner is compromised from an impact or other factors, it may not offer the full protective capability it was designed to provide.
Helmets don’t last forever. Damage to a helmet is not always visible. If a helmet is visibly damaged (cracked outer shell, crushed or cracked foam liner or any other damage) don’t use it. Some or all of the helmet’s protective capacity is used up when impacted. If at any time you are unsure or have questions about your helmet’s condition, we recommend that you visit your local retailer.
We make every reasonable effort to support products for a full lifespan. However, if a product is more than 5 years old, we may not have spare parts available. We recommend that helmets should be replaced every 3-5 years to ensure you have the full protective benefit of a quality helmet, as well as a helmet with the latest technologies and that meets the most relevant current standards. Thank you for your understanding.
You can do this in a few easy steps:
Cleaning and Storing a Helmet
Helmets are generally made of materials that can be damaged by many commonly-available cleaners. Petroleum-based solvents or cleaners are especially dangerous. They can damage a helmet so that its protective capabilities are significantly reduced. Many times, this damage is not visible. For best results, clean the helmet using a soft cloth or sponge, warm water and mild soap (such as a mild dish soap). Allow the helmet to air dry and then store it in a cool, dry place where it won’t get damaged.
Note that excessive heat can damage your helmet. For example, in direct sunlight a dark gear bag, the interior of a car, or an automobile trunk can get hot enough to cause heat damage (damaged helmets will appear to have uneven or bubbly surfaces). Therefore, when not being used for a period of time we recommend that the helmet be placed back into its box or case and stored in a cool, dry place.
Lice Removal
If you are concerned about lice infestation, here’s a simple, effective way to get rid of them:
• Do not use a spray of any type.
• Place the helmet into an airtight plastic bag for 48 hours. Then, remove the pads and use a soft cloth or sponge, warm water and mild soap to clean the surface.
• Discard the pads and plastic bag (keep bag out of reach of children due to suffocation hazard) and visit your local dealer or contact the manufacturer for replacement pads.
Giro does not recommend paints or solvents of any kind be used on the helmets. They can damage a helmet so that its protective capabilities are significantly reduced.
If your Giro helmet has been involved in an accident, you may be eligible for a discount on a new Giro replacement helmet. To learn if your helmet qualifies, please email us at giro-consumersupport@giro.com with the below information:
• Picture(s) of the damaged Giro helmet
• Giro helmet model and serial number
• Giro helmet size and color
• Giro helmet manufacture date
• Your full name
• Your phone number
• Your shipping address
This Crash Replacement Program is available to US customers only. Customer in the U.S. should please call us at (800) 456-2355 or e-mail us at giro-consumersupport@giro.com regarding helmets that have been involved in a crash or require spare parts. If you live outside of outside of North America Please see www.giro.com/Contact-Us for contact details for more information. Thank you!
Giro™ snow helmets are intended for skiing and snowboarding. (“Giro™”), located at 5550 Scotts Valley Drive, makes the following Limited Warranty concerning Giro™ snow helmets. This Limited Warranty is made only to the original purchaser. It is not transferable, and is void to any subsequent owner.
Giro™ snow helmets are guaranteed to be free from defects in materials and/or workmanship for a period of one (1) year from the date of purchase. Giro™ will, at its option, replace or repair defective helmets. To receive warranty service, within one year the original owner must return the helmet to an authorized Giro™ dealer along with the original sales receipt.
This warranty does not cover defects, damage, malfunctions, or failures resulting from abuse, neglect, improper care, alteration, collision, or a crash.
Please see www.giro.com/Contact-Us for contact details and information about initiating a return authorization if necessary. Thank you!
Yes, some snow helmet models allow the removal of the fit system, however, we do not advise it since the fit system enhances the fit and stability of the helmet while riding.
Yes, some snow helmet models allow the removal of the goggle retainer, however, we do not advise it.
Shoes
If your shoes are equipped with our adjustable SuperNatural Fit Kit Insoles, you can choose from the different arch supports supplied to customize fit and feel of the shoes to meet your needs:
• Large arch support = maximum height and support
• Medium arch support = medium height and support
• Small arch support = lowest height and support
Figure 1:

NOTE: We recommend that you start by choosing the arch support that most closely matches to the contours of your arches or the insole of your existing cycling shoes, and provides you with the most comfortable fit in the shoe. You should always consult with your local bicycle fit expert to tune your fit for maximum comfort and performance, especially if you experience any significant or consistent pain while riding.
To Start
Start by trying the shoe with the installed Medium (orange color) arch support, which works well for a majority of riders. You may want to ride with the stock setting to see how it feels during a normal ride.
To Adjust the Arch Support
To change the level of support, simply remove the insole from the shoe and peel off the arch support attached to the bottom of the insole. Then install a different arch support based on your desire for more or less arch support.
Arch Too High
If the arch support presses uncomfortably into your foot or if you are experiencing any lateral discomfort (on the outside edge of your feet), try a lower arch support.
Arch Too Low
If you are experiencing cramping or hot spots under the feet, or the arch of your foot feels unsupported or flat, try a higher arch support. Once you’ve set the arches to your preferred level of support, we recommend that you take the extra arch supports along on a test ride in case you want to make changes once you’re on the bike.
If your shoes feature a footbed with non-adjustable arch support, you can purchase our SuperNatural Fit Kit as an upgrade. The benefits are a more customized fit, and support for comfort and efficiency.
Giro shoes have been designed to be compatible with the most popular clipless pedal and cleat systems or flat pedals, depending on the type of riding they are intended for. To ensure compatibility, please read the instructions provided with your pedals to confirm specifications and proper installation, maintenance recommendations and adjustment of the cleat and pedal system. Note that some pedal systems may require the use of an adapter.
If you have additional questions about pedal compatibility, please contact your authorized Giro dealer or our Customer Service group for assistance.
The instructions below are a guide. We recommend that you consult the owner’s manual or instructions that come with your pedals to be sure your cleats are installed correctly.
Cleat Installation
Install cleat system as described in the drawings below or follow the instructions provide with your pedals.
See Diagram 1.
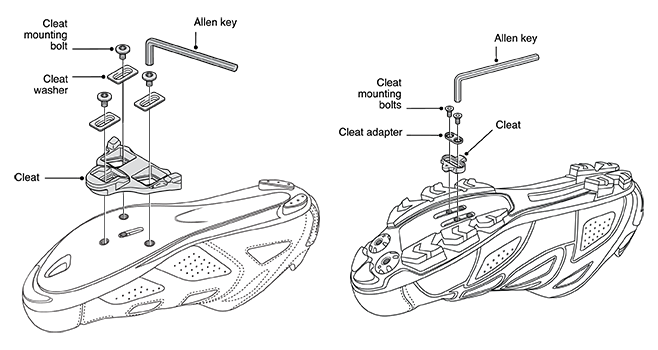
Cleat Positioning
Cleat positioning is a matter of personal choice, and can affect your riding comfort, power and efficiency. Positioning the cleat over the ball of the foot or slightly forward should maximize your power output. Positioning the cleat slightly behind the ball of the foot may increase comfort.
When you first attach cleats to the shoe sole, temporarily tighten cleat bolts to 22 in. lbs. (2.4Nm).
Once you have determined the optimal cleat position, firmly tighten the cleat mounting bolts. For final mounting, recommended cleat bolt torque is 41-52 in. lbs. (5-6Nm). Do not over-tighten bolts! We recommend that you follow the torque instructions for the cleat system and use those specifications if they indicate lower torque settings. 6Nm should never be exceeded when attaching the cleats!
Before You Ride
Before riding in your new shoes with cleats and clipless pedals, you should practice using the shoe and clipless system. Practice clipping-in and -out of the pedal while keeping one foot on the ground to maintain balance. When riding for the first time, find a clear area to practice clipping-in and -out of the pedal system until the motion becomes familiar.
Giro shoes are designed to accommodate a wide range of fit adjustments; however, we cannot guarantee the fit with custom orthotics. We advise you to work with your orthopedist and/or a professional bike fit technician if you are considering the use of custom orthotics with Giro shoes.
When properly cared for, your new Giro cycling shoes will offer many miles of performance.
• To clean shoes covered in mud, dirt or road grime, wipe them clean with a damp sponge or cloth.
• Never clean shoes in the washing machine.
• Do not clean your shoes using strong detergents or abrasive pads or brushes.
• Do not expose your shoes to extreme heat. Using a fire, radiator, blow dryer or other heat source to dry your shoes can damage them and void warranty.
• Shoes and pedals may not engage properly in cleats that are dirty or worn. Regularly check cleats and cleat area for dirt or debris and replace worn cleats as needed or recommended by pedal manufacturer.
• If shoes become wet, you can stuff them with newspaper to help absorb moisture and maintain shape. In most cases newspaper will dry wet shoes overnight.
We offer replacement part kits for the ratcheting buckles and straps, as well as the pedal cleat inserts and toe spikes (for MTB shoes). We also offer replacement parts for the walking pads on some models. You can order these parts through your local authorized Giro® Footwear dealer, or through our customer service group directly. Note that you should only use Giro® replacement parts and/or those available via Giro, since other parts can void the warranty on your Giro shoes.
Giro™ cycling shoes are intended for cycling. (“Giro™”), located at 5550 Scotts Valley Drive, makes the following Limited Warranty concerning Giro™ cycling shoes. This Limited Warranty is made only to the original purchaser. It is not transferable, and is void to any subsequent owner.
Giro™ cycling shoes are guaranteed to be free from defects in materials and/or workmanship for a period of one (1) year from the date of purchase. Giro™ will, at its option, replace or repair defective shoes. To receive warranty service, within one year the original owner must return the shoes to an authorized Giro™ dealer along with the original sales receipt.
This warranty does not cover defects, damage, malfunctions, or failures resulting from abuse, neglect, improper assembly of the pedal or pedal cleat, improper maintenance, alteration, collision, or a crash.
Please see www.giro.com/Contact-Us for contact details and information about initiating a return authorization if necessary. Thank you!
The 60 Days to Decide Program is Giro’s Comfort Guarantee. Every Giro cycling shoe is designed to offer a supportive, comfortable fit on the bike. With our 60 Days to Decide comfort guarantee, you have 60 days from the date of purchasing a Giro cycling shoe to evaluate the fit and comfort for yourself. So, try us on! If the fit or feel isn't right, we'll work with you to find the right solution. Speak with your retailer or a Giro customer service representative if you have questions regarding this program or Giro products.
Please note:
• This Comfort Guarantee program is only valid for original purchaser.
• This Comfort Guarantee program is not available in all regions. Customers outside of USA should check with their local Distributor regarding this program.
• You must provide proof of purchase to make an exchange or return under this program. All returns must be processed through the authorized Giro retailer the product was originally purchased from.
• Purchases made through Giro.com must be processed directly through Giro. See Giro.com or contact our Customer Service group for assistance with returns and exchanges.
• Comfort Guarantee is good for 60 days from date of purchase. Items received after 60 days will not be processed under this policy.
• Shoes must be cleaned and in good condition as determined by Giro. They cannot be modified or damaged from crash or abuse.
• Product defects in materials or workmanship are not covered under this guarantee. See our Warranty Policy for details.
• Replacement shoes are subject to stock on hand. Giro reserves the right, at its sole discretion, to make product substitutions or refund the purchase price.
• Giro reserves the right to change or cancel this program at any time.
Goggles
Follow these Instructions to swap the lens in a standard Giro Snow goggle:
Carefully remove the lens by separating the frame from the lens. Begin at the top and work around the perimeter of the frame. When installing the new lens, start with the nose and work around the sides until you get to the top.
The following models will fit the majority of people who wear eyeglasses. Note that we cannot guarantee a proper fit for every combination of face shape and eyeglass size, so we strongly recommend that you try the goggle on with glasses before purchasing.
OTG Compatible:
INDEX
OTG Friendly:
Contour
Axis/Ella
Agent/Eave
Article/lusi
Balance/facet
Blok
Method
Ringo,Millie, Ringo jr
Grade
Semi/Dylan
Roam/Moxie
Cruz
Do not use any paper products, including Kleenex® or similar tissue. To clean the outside of the goggle lens you can breathe on the lens to create moisture vapor and gently wipe the outside lens with a soft microfiber cloth. If you need to clean the inside of your lens gently dab the lens rather than wiping it, which can create scratches that permanently damage the lens.
The right size goggle and good fit to your face (and with a helmet) are essential to reducing the chances of fogging. Make sure your goggles form a tight seal on your face. Make sure to store them in a dry, warm, well ventilated area so they are sufficiently dried out after each use.
VIVID is a patented lens technology—developed by Giro in partnership with ZEISS Optics—that improves the visual experience on snow by enhancing contrast and definition. VIVID reduces eyestrain, improves reaction time, boosts confidence and delivers precise vision without color over saturation.
Conventional goggles and sunglasses are designed to eliminate blue light. The long-held belief was that blue light = bad light. Our research proves that seeing this blue light is fundamental in processing terrain. VIVID Lens Technology effectively manipulates blue light by letting in contrast enhancing blue light, while blocking harmful UV light. VIVID essentially filters out the haze and frees your eyes to spot your line and focus on enjoying your experience.
Ultraviolet (UV) radiation is electromagnetic energy. The wavelengths of this energy are outside of the visible light spectrum. UVA rays are primarily absorbed within the lens of the human eye. It is hazardous to your eyes because it has a cumulative effect, which means that any damage it causes is irreversible.
UVB rays burn your skin and can damage your eyes. Combined with cold wind and snow, UVB has the potential to cause snow blindness, cataracts, and other nasty stuff that will end your fun! UVC is harmful too, especially to the cornea region of the eye, but it most of it is absorbed by the earth’s atmosphere before it can reach your eyes. All Giro sunglasses provide 100% UVA/UVB/UVC protection up to 400nm.
The color of the lens is only half the story. The other half of the story is the visible light transmission rating (VLT) of the lens. Each has a role in helping to enhance your vision and comfort.
Lens Color
The lens color emphasizes or filters colors that affect your vision.
VLT Rating
The VLT rating is the amount of visible light that is transmitted through the lens to your eyes. Amber or Rose-colored lenses enhance the grays that mark shadows on a road or snow slope. Yellow or Orange lenses block out the blue light that creates a “hazy” effect on your vision. Grey lenses maintain the truest color.
By matching the lens color to a VLT rating that provides your eyes with the right amount of light, lens tints enable you to make out shadows, hazards and so on more clearly. Giro offers a full range of lens tints that are tuned to enhance your vision in a variety of conditions.
(“Giro™”), located at 5550 Scotts Valley Drive, makes the following Limited Warranty concerning Giro™ goggles. This Limited Warranty is made only to the original purchaser. It is not transferable, and is void to any subsequent owner.
Giro™ goggles are guaranteed to be free from defects in materials and/or workmanship for a period of one (1) year from the date of purchase. Giro™ will, at its option, replace or repair defective goggles. To receive warranty service, within one year the original owner must return the shoes to an authorized Giro™ dealer along with the original sales receipt.
This warranty does not cover defects, damage, malfunctions, or failures resulting from abuse, neglect, improper care, alteration, collision, or a crash. Please see www.giro.com/Contact-Us for contact details and information about initiating a return authorization if necessary. Thank you!
Gloves
Synthetic Gloves
For best results, clean the gloves using lukewarm water and a mild liquid soap or cleaner. Then allow the gloves to air dry away from direct sunlight. When almost dry, you can put the gloves on to give them shape, and then gently remove them. Make sure they are laid flat.
Leather Gloves / Leather Palm Gloves
For gloves with leather, extra care will help to extend the life of the gloves, and a good leather conditioner can help to keep the leather supple since washing can damage it.
• Use lukewarm water and mild soap to gently wash the glove (you can wear the glove while washing to help maintain the glove’s shape).
• Gently pat dry with a towel to remove excess water.
• You can put the gloves on to give them shape, and then gently remove them. Make sure they are laid flat.
• Hang to air dry away from heat or direct sunlight.
• When almost dry, you can put the gloves on to give them shape. You can also gently rub a good leather conditioner into the leather to help keep it supple
NOTE: Never dry clean, bleach or tumble dry!
How to Store Gloves When Not In Use
After each use remove the gloves carefully, lay them flat, and allow the gloves to air dry in an open area. Then store in a cool, dry place.
NOTE: We strongly discourage leaving used gloves in damp, enclosed spaces (like the bottom of a gear bag) since that can inhibit proper drying and cause the leathers or other materials to become stiff or brittle.
Giro™ cycling gloves are intended for cycling. (“Giro™”), located at 5550 Scotts Valley Drive, makes the following Limited Warranty concerning Giro™ cycling gloves. This Limited Warranty is made only to the original purchaser of cycling gloves. It is not transferable, and is void to any subsequent owner.
Giro™ cycling gloves are guaranteed to be free from defects in materials and/or workmanship for a period of one (1) year from the date of purchase. Giro™ will, at its option, replace or repair defective gloves. To receive warranty service, within one year the original owner must return the gloves to an authorized Giro™ dealer along with the original sales receipt.
This warranty does not cover defects, damage, malfunctions, or failures resulting from abuse, neglect, improper care, alteration, collision, or a crash.
Please see www.giro.com/Contact-Us for contact details and information about initiating a return authorization if necessary. Thank you!
Apparel
The 60 Days to Decide Program is Giro’s Comfort Guarantee. Every Giro cycling short with a chamois is designed to offer a supportive, comfortable fit on the bike. With our 60 Days to Decide comfort guarantee, you have 60 days from the date of purchasing a Giro cycling short featuring a chamois to evaluate the fit and comfort for yourself. So, try us on! If the fit or feel isn't right, we'll work with you to find the right solution. Speak with your retailer or a Giro customer service representative if you have questions regarding this program or Giro products.
Please note:
• This Comfort Guarantee program is only valid for original purchaser.
• This Comfort Guarantee program is not available in all regions. Customers outside of USA should check with their local Distributor regarding this program.
• You must provide proof of purchase to make an exchange or return under this program. All returns must be processed through the authorized Giro retailer the product was originally purchased from.
• Purchases made through Giro.com must be processed directly through Giro. See Giro.com or contact our Customer Service group for assistance with returns and exchanges.
• Comfort Guarantee is good for 60 days from date of purchase. Items received after 60 days will not be processed under this policy.
• Shorts must be cleaned and in good condition as determined by Giro. They cannot be modified or damaged from crash or abuse.
• Product defects in materials or workmanship are not covered under this guarantee. See our Warranty Policy for details.
• Replacement shorts are subject to stock on hand. Giro reserves the right, at its sole discretion, to make product substitutions or refund the purchase price.
• Giro reserves the right to change or cancel this program at any time.
Every piece of Giro cycling apparel is designed to enhance your comfort and performance on the bike. However, just as different bikes serve the needs of different riders, our line of apparel offers different features at each level.
• Chrono Pro – Advanced materials with cutting-edge fabrication are combined to help you achieve your best possible results, whether you’re racing for every split-second or going longer than 4 hours on the bike.
• Chrono Expert - Luxurious materials with modern design and fabrication give you the support you need to get the most out of every ride, with leading style.
• Chrono Sport – The best of the basics, with proven fabrics and construction that help to ensure you’re comfortably supported over the course of shorter, less intensive rides.
At this time, Giro does not offer Custom Apparel to teams, clubs or consumers. However, you may see Giro Custom represented at your local bike shop, so we encourage you to check with, and support, your local retailer.
UPF stands for Ultraviolet Protection Factor, and indicates how much of the sun's UV radiation is absorbed or blocked. A fabric with a rating of 50 will allow only 1/50th of the sun's UV rays to pass through. This means the fabric will reduce your skin's UV radiation exposure significantly, because only 2 percent of the UV rays will get through.
What's the Difference between UPF and SPF?
SPF stands for Sun Protection Factor and is the rating you're familiar with for sunscreens and other sun-protective products. It measures the amount of time it takes for sun-exposed skin to redden, while UPF measures the amount of UV radiation that penetrates a fabric and reaches the skin.
The best way to optimize comfort and performance while protecting against the elements is to wear three separate layers—a base layer worn against the skin for moisture management and insulation; a middle layer for temperature control and storage; and an outer layer to protect against cold, wind or rain. Each has a unique purpose, and when sized and worn properly, all layers work together to help you get the most out of your ride.
In order for a base layer to wick moisture properly, the fabric needs to lay against the skin. To enable this, the fit should be relatively snug.
Wicking materials are special fabrics that draw sweat away from the body, pushing moisture to the middle and outer layers. The surface area of wicking materials is considerably greater than that of fabrics like cotton, making it easier for moisture to evaporate. This helps you to feel drier and more comfortable in almost any condition.
WickPro is an advanced performance base layer fabric designed to pull perspiration away from the body and accelerate moisture movement and evaporation, in order to enhance your comfort during high intensity activities. The high-stretch capability of this fabric allows it to conform closely to the body for exceptional comfort and performance.
DWR (durable water repellent) fabric finishes help to repel light rain and snow, and decrease drying times when garments are subjected to wet conditions. When DWR is used in conjunction with a waterproof/breathable barrier, the DWR finish keeps the outer fabric from becoming saturated so that the breathable barrier can do its job.
Please check the label inside of each garment for instructions regarding cleaning and care.
Giro™ cycling apparel is intended for cycling. (“Giro™”), located at 5550 Scotts Valley Drive, makes the following Limited Warranty concerning Giro™ cycling apparel. This Limited Warranty is made only to the original purchaser of cycling apparel. It is not transferable, and is void to any subsequent owner.
Giro™ cycling apparel is guaranteed to be free from defects in materials and/or workmanship for a period of one (1) year from the date of purchase. Giro™ will, at its option, replace or repair defective apparel. To receive warranty service, within one year the original owner must return the apparel to an authorized Giro™ dealer along with the original sales receipt.
This warranty does not cover defects, damage, malfunctions, or failures resulting from abuse, neglect, improper care, alteration, collision, or a crash.
Please see www.giro.com/Contact-Us for contact details and information about initiating a return authorization if necessary. Thank you!
At this time, we do not offer crash replacement or repair on apparel.
Pro Deal Program
If you work in the cycling or snow sports industry, you may qualify for our Pro Deal Program. Apply Here.
No further discounts are offered once a product is sold out. Sale pricing is effective while supplies last. Discounts are handled at the sole discretion of GIRO and are applied on select colors only. Giro reserves the right to request additional information to verify your order. Your order may be canceled until it can be verified - we do this to protect the identity of our customers and to provide a safe online experience.
Orders
No, orders can not be canceled or modified once submitted.